


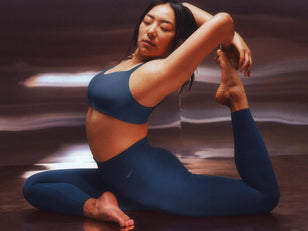


If you're an avid yogi, you're probably familiar with "Crow Pose". But if you're looking for a progression to challenge your practice, why not give "Flying Crow" at try?
This dynamic pose recruits the body's stability and ability to balance upper and lower body strength. If you're ready for your next challenge, read on for our advanced guide to "Flying Crow".

WHAT IS FLYING CROW?
The arm balance Eka Pada Galavasana, often referred to as “Flying Crow” is a pose that gives us the experience of doing just that: flying. The pose is a dynamic play between the stability and steadiness of the body and the graceful “seesawing” between the upper and lower body.
Too much of one thing or the other and you’ll land on your nose! The best way to describe the pose would be a ‘one-legged’ crow where you create a crow pose with one leg extended.
What are the benefits of Flying Crow?
-
Strengthens the arms, wrists, neck, and shoulders
-
Opens the hips
-
Strengthens the core
-
Improves balance
How to warm up for Flying Crow
Flying Crow requires the hip flexibility of Pigeon Pose (Eka Pada Rajakapotasana) and the balance technique of Crow Pose (Bakasana). As a warm up, you may want to check out our guide on creating strong, mobile hips.
Focusing on these two poses to start, and really mastering them, will give you the foundation of strength and focus you need for Flying Crow and many other advanced arm balances.
STEP-BY-STEP GUIDE
-
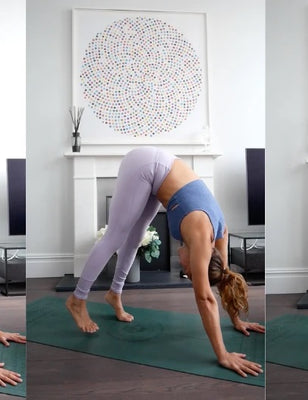
Step 1: Warm up with Crow Pose. A guide to achieving simple Crow Pose can be found here.

-
Step 2: Start in three legged dog
-
Step 3: Shift into three pointed plank bringing right knee to right tricep

-
Step 4: Place knee just above the elbow
-
Step 5: Start to lean forward shifting weight into hands while lifting the hips
-
Step 6: Continue to lean bringing weight off the left toes

-
Step 7: As you shift weight completely into hands engage the left leg and glute
-
Step 8: Keep the spine domed, hugging rib cage in and lifting through pelvic floor
-
Step 9: for extra aesthetic point the left toes and smile!

Variations
- One of the most likely places to get stuck when you're learning Flying Crow is trying to straighten your back leg and keep it off the floor at the same time. As you're learning, it is fine to keep that back leg bent and gradually work on straightening it as you find your balance.
- Alternatively take time to master crow pose which will give you a strong foundation for when you’re eventually ready to push yourself to advance.
CONCLUSION
The fear of falling can be a sticky point in gaining confidence to balance on your hands. At the start of your journey perhaps use a block or cushion under the brow so as to not be held back from taking the plunge. Remember your practice is all about having fun so embrace the wobbles and enjoy the journey!